Possibilities and Limitations of 2D
Eyes, Camera, Action!
Throughout the rest of this module, we will be exploring how 3D systems can be used for visual assessment of the golf swing. While the focus for this course is 3D technology, we do not mean to give the impression that it is the only option for assessment. Direct observation and 2D video have been used successfully for decades. All three methods have their own strengths and weaknesses and we would like to take a moment to discuss some of those here. As you read through the material in this module, we encourage you to evaluate all three options for assessment and consider when and how each could be best used for instruction.
When we directly observe an object in motion, we naturally use a lot of visual information to help us know how much it is moving, how fast, and in what direction. In some ways our eyes work almost like two cameras in a 3D system. Just as light goes through the lens of a camera and is recorded as a 2D image, light goes through the lens of the eye and is ‘recorded’ by the retina. The images sent from each eye to the brain are slightly different, something you may have observed when object appears to shift when viewing it with one eye open and then the other. What our brains do is put the two images together and interpret a 3D image in our minds. We do this automatically from birth, but doing it well takes practice and experience, as anyone who has watched a 4-year-old and a 10-year-old try to catch a ball knows.
Interpreting 3D motion is done immediately and subconsciously using use a host of factors; some that we are aware of and some that we are not. You probably know some of the information you use; the relative size, shape, and focus of the golfer as well as all of the other objects in view (grass, trees, flagstick, other people, etc.). Also, using your experience, you know how an object should be moving. But some of the information we use is completely subconscious. We use information about where an object is located on each retina, how fast something is increasing or decreasing in size, and whether it is moving similarly or differently across each retina. These are vital pieces of information that we use to determine how fast something is moving toward or away from us.
When we use video analysis, we gain several advantages and are able to do things that we simply cannot do with our eyes. Video allows us to save and show the swing to the golfer or other instructors and it allows us to slow down or stop the swing. These can all be powerful opportunities for golf swing assessment. But when we only look at video, we start losing some of the information we normally and subconsciously use to assess movement, and we lose even more information when we only have still images. As we all know, the camera can ‘play tricks’ on our eyes at times, something that movie directors like to do! So whether using our eyes to view a live swing or video to review a swing, we should keep in mind that both have their strengths and weaknesses. Each can be used with great success, but we must be careful to use them appropriately.
2D Video Example
We have provided a few videos from some of Maribel’s swings. As you watch these, make note of the similarities and differences you see between each side-by-side video.
Location, Location, Location...
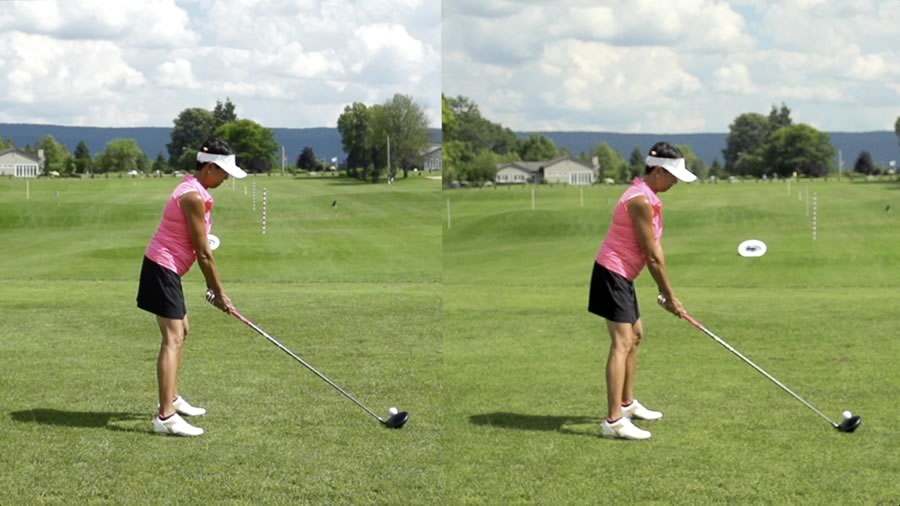
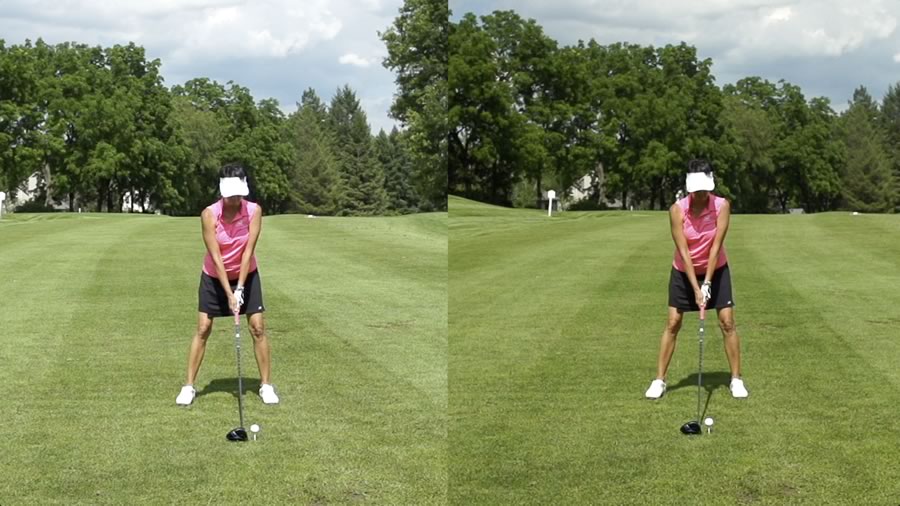
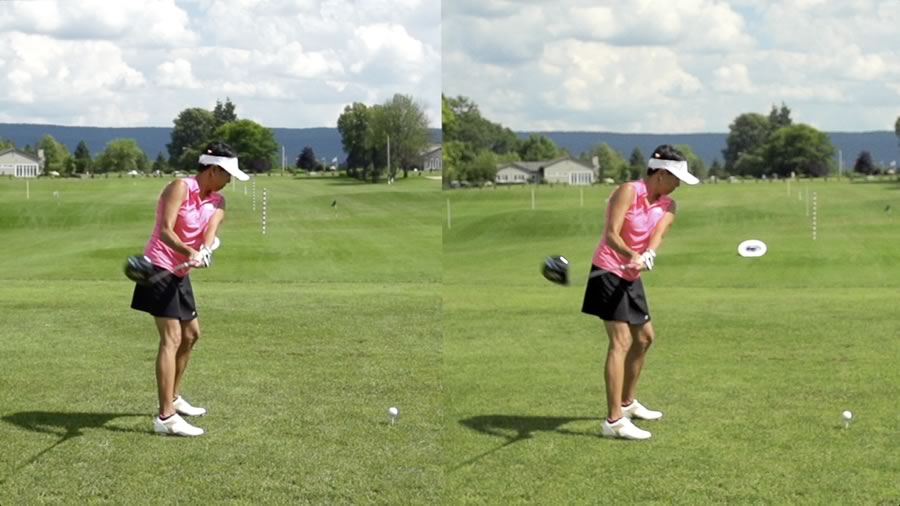
As you are certainly aware, camera position is important for swing assessment and comparison but is hard to tell just how important. To do that, you would need video of the same swing from nearly identical camera positions, so that is what we did. We set up two cameras right next to each about 20 feet away from the golfer, the cameras recorded at 240 frames per second and were synchronized so that each frame was taken at exactly the same time. We filmed one swing with the cameras face on, and then another with the down the line view.
Placing the cameras that close to each other and that far away from the golfer minimizes the difference in camera viewing angle. The video of each swing should look virtually identical; and with the cameras synchronized, each frame of each should look virtually identical. The camera positions were chosen to create a "best case scenario"; realistically, this is the closest we can expect the camera position to be when comparing two different swings. The difference in viewing angle for the two cameras was about 2 degrees.
You may have thought to yourself that the videos are quite similar and gotten the same feel for the swing from each video. Instructors will often use additional information to help them interpret what is taking place. For example, we can use the background in the Down the Line videos to help interpret more about the set up positions by looking at the swings and watching the path of the club relative to the distance poles or the range targets.
If however, we move from a visual assessment, to using still images for comparisons, even our best-case scenario starts to fall apart. Let’s now take a look at some still images from these same swings.
 The small camera angle shift here shows up as a possible difference of alignment to the target.
 From these perspectives, it appears as if there is a difference in ball position.
 As the club moves back to parallel it appears that there is a difference of the club head relative to the hands.
We all know that visual assessment and feedback, along with instructor experience, can be great. But, when we move to a direct comparison, particularly via still images, the camera can lie.